CHORD BUTTONS AND BARS
PolyHarp uses Chord Buttons to control virtual Chord Bars that do the damping, undamping, and retuning of the virtual strings. Normally, Buttons are supercircle ("squircle") shaped, but different kinds of buttons have different shapes. The Label used on the button is controlled in the PolyHarp Patch Dialog.
Here is the editor for a Chord Button, which is accessed in Edit Mode, when you are in the "Move and Set" sub mode. Tap on the Chord Button you want to start with and this Chord Button dialog will appear.
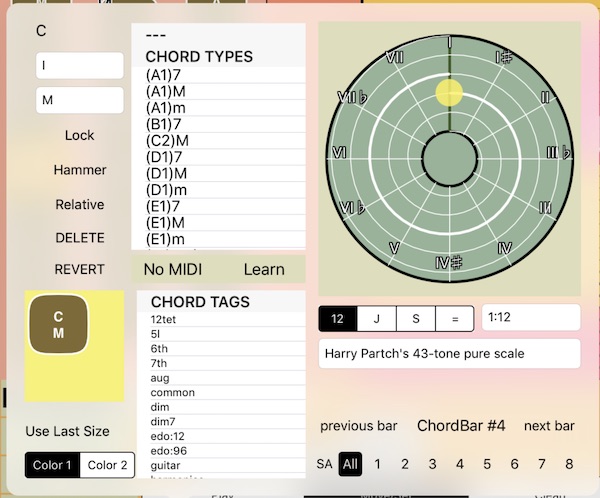
This lets you set these Chord Button properties:
- The transposition interval: You can set that transposition interval by using the Tone_Spiral, or type in an interval specification directly.
The Chord Type . See Chord Types for details! You can just pick a Chord Type out of the big list, or sift the list by tapping one of the tags below, or type in the chord type name directly (it must exist, though).
The Hammer, Lock, Relative, and Sustain properties: these options toggle on and off.
Hammer makes the button into a hammer: every time you touch it, it plays all the playable notes. The undamped strings are still available to strum. I'm not sure what velocity values hammered strings get.
Hammer Buttons have rectangular buttons.

Lock means tapping it once keeps the bar down and locks off damped notes, or even does transposition on the strings "permanently." You can use it to damp out strings in other scales. Tap it again to unlock it.
Lock Bar Buttons have shield-like buttons.

Relative means that the interval assigned to the button is applied to the base frequency, transposing the whole PolyHarp with one button. It's like the Capo feature. Setting the interval to 1/1 (0 cents) will reset the base Frequency to what it was before all the relative transposing.
Relative Buttons have supercircle shaped buttons, but with the edge a different color.

Sustain acts like a sustain pedal, which is to say, when it's on , and you strum a chord and change to a new chord, the notes not in that chord will keep playing (just like a piano sostenuto pedal). It's good to use this with Lock turned on, and only with Stay Down off. Technically, only the notes in the Sustain chord will still sustain, so it's a good idea to set it be the same as the scale all the other chords' notes are in, like 12EDO. It's also a good idea to use chords that are sparse, so it's not like banging on a piano with the dampers up.
Sustain Buttons have a hexagon drawn on them.

Delete will delete the button.
Revert will reset the button to how it was when the dialog came up.
Chord Button Shape and color
- The Chord Button's shape: The Button sizer lets you drag around the lower right corner to adjust the rectangular shape of the button. You can even drag out of the box if you want to make a really big or long button.
- The current Chord Button's size can be set to the same as the last one you edited with the "Use Last Size" control button.
- You can choose one of two colors for the button.
String Area Assignment
- The string areas that this Chord Button will apply the corresponding Chord Bar to.

You can tap "all" or pick which one of up to 64 string areas that this Chord Button will affect.
This way you can have different string areas play different chords, or keep one area playing a locked chord. You can set up drone strings and other peculiar effects this way.
The All button toggles between enabling or clearing all the string areas. Since "no string areas" makes no sense, that also means all chords map to all string areas.
Since you can only see 8 buttons at a time, the "arrow 8" buttons let you scroll through sections of enabling buttons.
MIDI Assignment
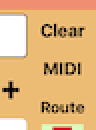
- Learn You can associate a Chord Button with a MIDI event, either a NOTE ON/OFF or a CONTROL. This way you can control Polyharp Buttons from an external MIDI controller. before you start, make sure you have chosen a source for the MIDI in signals! To do that, go back to Play Mode and tap the Route button. Then enable or disable the MIDI Sources.
 -
- 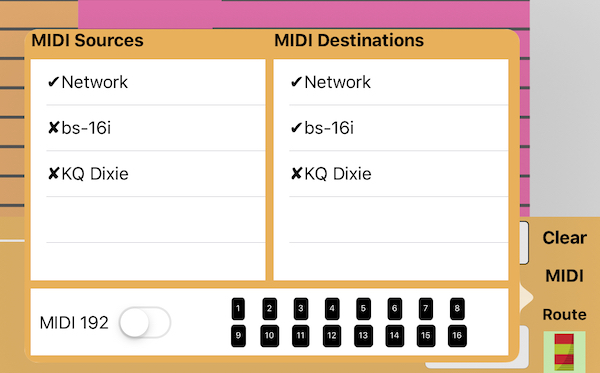
- Touch the "Learn" button and play a note or control on a MIDI controller. When it's set, touch "Done"!
- Or, tap on the label Next to "Learn" and a dialog appears where you can set the MIDI command
Ⓒ or Note Ⓝ that is associated with the Chord Button by hand. Select Ⓧ to clear the association.
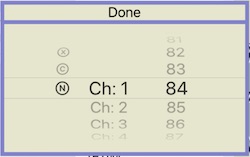
Once a MIDI event is assigned to a Chord Button, it will display it at the bottom of the button:

Setting the Transposition Interval
The Tone Spiral is a pretty simple one, it lets you set guides to snap to. The choices are:
- 12 : 12 EDO scale. Note that it's only one octave, for intervals out of that octave, choose "=" with a base of 12.
- J: Just intonation
- S: the current Scala Scale. Sorry, you can't choose a Scala scale here, for that you need to use the Chord Types
- =: Equal intervals, specifies in the text area next to the "="
More editing
- You can finish editing your bar and go to an adjacent bar using the "previous bar" and "next bar" buttons. The order is a little hard to determine though!
Arranging Chord Buttons
Once the chord button dialog is done (tap outside it), you can arrange the positions of the buttons.
- You can move any chord button anywhere on the screen by just dragging where you want it.
- You can move all the Chord Buttons in the chord box around by touching in the box where there are no buttons and dragging it. You can rescale the box and all the buttons by using two fingers anywhere to zoom, rotate, and move them! If you somehow lose the box, you can get it back (usually) by shrinking it with a pinch until it reappears.
- Dragging and positioning can be affected by a grid if the grid is turned on, but it's not as simple as it looks! Buttons are aligned using the top left corner.
- Double tapping in the chord box, but not on a button, will flip the buttons around their x axis, which is a transform you can't do with just two fingers. Then you can reposition them!
- More sophisticated but somewhat bizarre chord button cleanup is done in the Clean Up sub mode.